We all know what is the traditional
approach to backup Exchange server for free – of course, the Windows Server
Free Backup! I’m not denying it is the most popular way to backup Exchange server
but it is also true there are some limitations as well which enforce Exchange
administrators to look beyond the basic backup method.
As a free Exchange server backup
solution, Windows Server Backup avails you lot of features which cannot be
expected in free Exchange backup tool, but there’re few shortcomings as well in
the traditional backup method such as - you cannot backup Exchange server
remotely, single mailbox backup is not possible, mandate to take full VSS
backups for logs to be truncate, etc.
So these are some of the key reasons
why do organizations go for third party Exchange backup software, because paid solutions
allow them new features and the fix to the limitations of free Windows Server
backup.
If you’re looking for an
alternative to Windows Server Backup which wouldn’t cost you more and lets you
lot of advanced features, I suggest you try Stellar
Phoenix Exchange Server Backup software.
This Exchange backup tool is
completely free for few months so you can try it out yourself and see how
beneficial it could be as a free solution.
So today in this article I’m
covering the complete process how to perform free Exchange mailbox backup using
this utility. Just download the software and install it. It is ready to use and
fully activated, as no activation key is required. Download the full version by
visiting the Steller’s official website: http://www.stellarservertools.com/exchange-server-backup.php
Free Exchange Server Backup using Stellar Exchange Backup Tool
The home screen of software allows
you to perform multiple jobs but click the first one MS Exchange Backup. To perform full Exchange server backup, select
first option.
On the next screen software will
display all the existing database available for the backup task. You can select
any storage group which you want to keep as backup, and click Next.
Depends on your requirement you
can choose any option from multiple Exchange backup types. If you’re creating
backup very first time, I suggest you select the first option the Full backup and click Next.
Now select the destination where
you want to store this backup. Click Select
local or network drive if you want to save it somewhere in local drive.
Select the folder to backup
selected storage group.
In case if you want to store the
backup at any remote location, click Select
FTP location.
Enter the correct FTP logon
details and click OK.
Select the FTP folder which you
want to use and click OK.
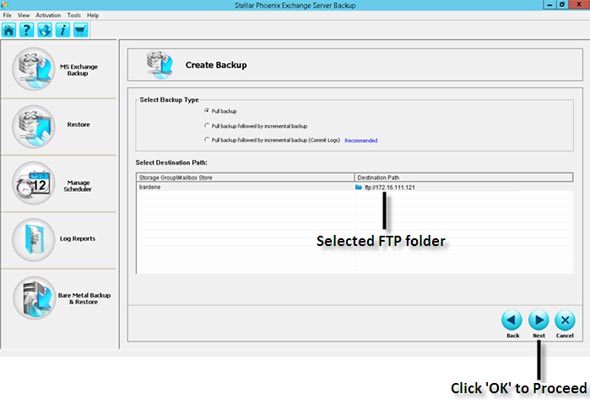
The next screen will display the
selected FTP folder in the Destination
Path column. Select the FTP folder and click Next.
Next screen is the Backup Settings page. You can configure
here the Notification details, backup scheduling, and Consolidation option.
Click Next once you’re done.
Now Click Finish and sit back. The complete backup summary will be shown on
the Backup Summary view.
One the backup job is completed,
a dialogue box of job successful will be appeared on your screen.
That’s it!
So these are the quick steps to
perform Exchange server full backup for free. In case if you want to perform
the Incremental backup, check here the software user guide, as it is even
easier to perform than full Exchange backup. Have a look into the Help Guide: http://www.stellarservertools.com/pdf/exchange-server-backup/User_Guide.pdf
However, we can also restore the
backup to the Exchange server using the same software Stellar Phoenix Exchange Server Backup but ’ll discuss this topic
in my next article. Until then, don’t forget to test this free Exchange server
mailbox backup tool over here: http://www.stellarservertools.com/exchange-server-backup.php
Stay tuned for the next post!!


No comments:
Post a Comment